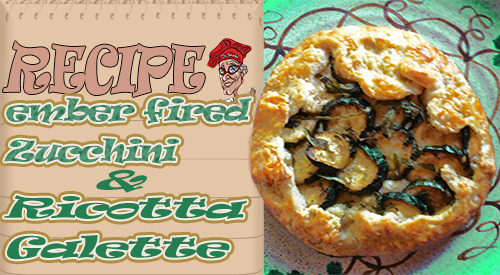
We are going French with a zucchini & ricotta galette that is simply out of this world. With ember fired zucchini we previously cooked on our charcoal grill with straight wood, this is one recipe worth making any time of year. Get 2 zucchini ember cooked and prepare yourself for the ultimate in wood fired flavors featuring summer zucchini!
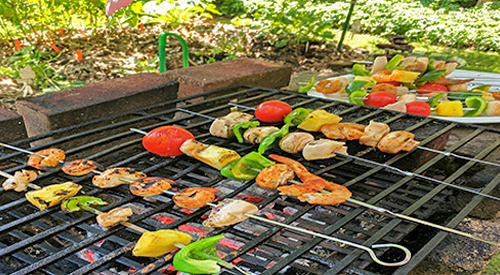
Having the experience of viewing her dad, our youngest staff member tried her hand at grilling for the first time! Look how great these Kabobs look!
MY FIRST EXPERIENCE AT THE CHARCOAL GRILL (by the intern)
I’ve had a lot of experience over the years watching my Dad at our homemade barbecue pit. I’ve never had the experience of doing the actual prep and cooking until now.
I’m taking on the grill and preparing some kabobs using charcoal and wood. This is my first attempt at cooking on the charcoal grill without any help. Learn what worked and didn’t work for me, a 20 year old who tackles the fire!
Selecting My Menu
In deciding on a menu and given that it is the hot summer in the East, I went with kabobs. Shrimp and chicken were selected as proteins and an assortment of vegetables plus pineapple for sweet.
I purchased fresh, de-veined shrimp to cut down on some prep time. After washing the shrimp, I laid them out on paper towels and pat dry with additional paper towels. To get a good char on the shrimp, I’ve read how important it is to get as much water out of the shrimp.
Something I learned after: I should have sprinkled a little kosher salt to aid the water removal.
For my chicken, I purchased chicken breasts with the skin already removed and cut these into cubes trying to keep all the pieces the same size for even cooking.
Protein Preparation
I wanted a little spice to the menu so I elected to use a Cajun seasoning on my shrimp. I made sure every piece was coated well.
Something I learned after: if I had prepared these even a few hours early, I could have sealed them in a storage bag and let them really infuse the flavor. For my chicken cubes, I marinated in a simple preparation of Italian salad dressing. This protein I did marinate overnight.
Other Preparation
I decided to incorporate more traditional items for my kabobs like tomato, pepper, mushroom and pineapple. I do a simple wash of the vegetables, then cut peppers and pineapple into even pieces big enough to be skewered. Button mushrooms are left whole as are my small tomato rounds. I make sure everything is at the ready to make assembly easy. I think this step in the kabob making was relatively easy to manage.
Kabob Assembly
As you can see, I did a bit of variation to my assembly process for the kabobs. I did mix my vegetables and fruit on a single skewer as well as my two proteins.
Something I learned after: I should have first oiled the skewer to ensure ease in removal of the food items once cooked. I also should have made skewers with the same food item on them so I could control the timing each item takes to cook. So, next time I will have full skewers of mushroom caps, full skewers of pepper, full skewer of shrimp, etc.
Charcoal Barbecue Setup
My barbecue is an open pit style, hearth level, hand built by my Dad. When cooking, we generally use charcoal or charwood with wood chunks and chips for flavor. Today, I went with Sugar Maple chunks (double filet size), for the kabobs. I learned the importance of starting a chimney starter of charcoal first to be sure all the coals are hot before they go into the charcoal area of my pit.
Something I learned after: if your grill is in a safe area, you can start the chimney starter while preparing the food items so by the time you get everything prepped, the coals are hot and ready to go.
Once my embers are burning red and starting to gray over, it’s time to pour them into the chimney brazier. My pit will hold about 6 lbs. of charcoal. Once the charcoal is in, I add my Sugar Maple wood chunks for flavor to the kabobs.
Something I learned after: I should have laid a bed of unlit coals in the charcoal brazier. That way, I could be sure to have enough heat for the entire cooking process and I would have a chance to use the hot embers later for other cooking.
Time to Grill
With my grilling grates in place, it’s time to add the foods. I ended up putting a series of skewers on the grates trying not to crowd the grates. I did cook some of the chicken and shrimp off the skewers to give my guests options for just extra protein.
Something I learned after: I really didn’t give much thought to the cooking time of each item so some things were cooking faster and drying out before others. Shrimp cooks faster than chicken so lesson learned: chicken needs to go on first. Plus, I need to brush with marinade or oil to keep things moist.
Lessons Learned
For my first ever effort at making kabobs on the charcoal pit, I was pleased with the results. Without question the sugar maple chunks from SmokinLicious®added to the great flavor. I was amazed at just how little wood it took to impart that smoky quality to the foods. I learned quite a bit along the way: my sequence of adding items to the grill needs to change. My longer cook items like chicken, peppers and mushroom need to go on first. That’s where having skewers made with just the one ingredient will really come in handy. Pineapple, tomato, and shrimp certainly take less time. I also need to keep a basting brush and cup at the grill so I can coat the food items either with marinade or oil to keep the moisture locked in the food.
Toasting Marshmallow & Peanut Butter Cup S’more
A great way to use the hot embers leftover when your main dish cooking is done is a simple dessert. Nothing shouts summer and fun like a s’more! Graham cracker, peanut butter cups, and marshmallow fired in the hot embers – oh so yummy good!
I hope you enjoyed this first-time griller’s experience at the charcoal grill. Leave a comment and subscribe to us so we can keep bringing you innovative tips, techniques, and recipes on working with wood for cooking, grilling & smoking.
Our guest blogger provides great insights into grilling a Beer-Can Chicken
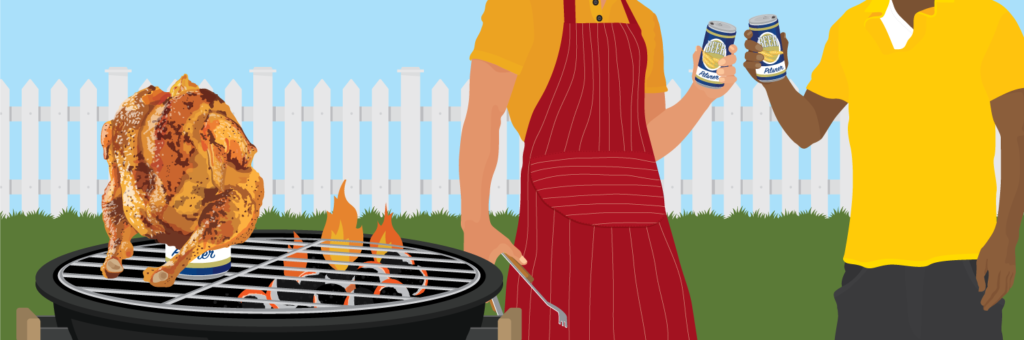
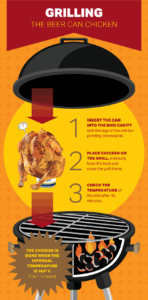
GRILLING A BEER-CAN CHICKEN
Guest Blogger:
Source: eReplacementParts Blog
Author: John Thomas
Beer Can Chicken- The “Wow” Factor:
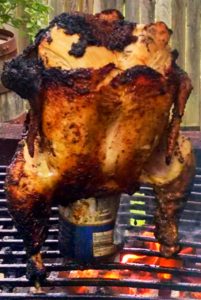
What says “grill master” more than grilling a whole chicken sitting on top of a can of beer that is infusing flavor and moisture into your bird? Beer-can chicken is often overlooked on the menu, but it’s a fun and proven way to grill a tasty whole chicken. Grab a whole chicken from the grocery store and beer or even some root beer or soda and get that thing on the grill for a guaranteed successful meal. This is an easy method for grilling a flavorful and tender chicken that keeps all eyes on the grill and provides that “wow” factor for any cookout you host.
Sure, it’s called “beer-can chicken,” but that doesn’t necessarily mean you have to use beer. There are tons of flavorful canned beverages out there if you are so inclined to something else. Any soda will make your chicken pop, or even an empty can with a little water and garlic. Beers like imperial stouts, pilsners, or lagers are great, but some other fun ideas include orange soda, cola, or root beer. Regardless, pick your favorite beer or soda. The first key to sitting your bird on top of a can is to make sure you start with room temperature beer or soda. You want that liquid to steam and if you start off with a cold beverage, it just might not get hot enough. Second, don’t use a full can. It takes a lot of heat to get that liquid to steam, so empty at least half the can prior to inserting it into the cavity of the chicken.
Beer Can Chicken- Two Recipe Choices:
For those of you who choose not to grill with beer, the first recipe choice offered here is a BBQ root beer chicken. This flavorful bird has a classic BBQ dry rub on the outside and root-beer-infused sweet flavor and moisture on the inside. The bird is brushed with any BBQ sauce you like toward the end of the cooking. After cleaning out the chicken, mix these dry ingredients together and heavily apply this simple BBQ dry rub all over the bird.
1 tablespoon salt 1 tablespoon brown sugar 1 tablespoon paprika 2 teaspoons black pepper 1 teaspoon garlic powder 1 teaspoon chili powder
Place the chicken on top of a can of root beer and grill as instructed below. If root beer isn’t your thing, orange soda can be substituted in this recipe.
The second recipe is more of a classic beer-can chicken that has a spicy dry rub applied to the outside. A classic pilsner or lager is used to provide moisture and flavor to the bird. The ingredients for the spicy dry rub recipe are as follows:
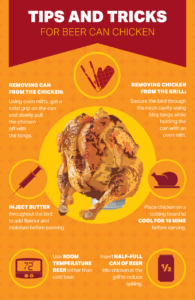
Clean out the bird and heavily apply the dry rub all over the outside. For an extra pop, a poultry butter injection inside the bird is fantastic. Most grocery stores sell a food injection needle set. Melt some butter and inject it into the thickest part of the breast and into the legs and thighs. The buttery flavor can’t be beaten.
Now that you have applied your dry rub to the chicken, set up the grill for indirect heat. For indirect heat, place charcoal on half the grill and cook the bird on the other half, above an aluminum tin to catch drippings. Grilling the chicken at a more moderate temperature reduces the chance of scorching the bird on the outside and undercooking the inside. On a gas grill, ignite the burners on only one side to medium-high heat. You want the grill to be at about 400-425 degrees for grilling a beer-can chicken.
It’s easiest to insert the can into the bird right at the grill to avoid it tipping over inside the house. The legs of the chicken extend down toward the grill and the can is inserted into the cavity between the drumsticks. After the grill is pre-heated, set the chicken, neatly propped up on top of the can, on the indirect heat side of the grill and close the grill dome. After about 45 minutes, check the internal temperature of the bird. The chicken will be done when the internal temperature is 165˚F. It should take about 1 to 1-1/2 hours to fully cook the bird, depending on your grill temperature.
Once your chicken reaches 165 degrees, you’ll need to remove the can and the chicken from the grill. Take some extra care to safely remove the bird from the grill. Use grill tongs placed in the neck cavity to secure the bird from the top while carefully holding the bottom of the can with some oven mitts or pot holders. The can will be hot and you can burn yourself and you don’t want to spill any liquid from the can. Get a solid grip on the can with your oven mitt/pot holder and slowly pull the chicken off the can with your tongs, then place it on a plate or cutting board. Leave the can on or near the grill and allow it to cool. Bring the bird inside for a quick 10-minute rest followed by carving.
Beer-can chicken is a fun way to grill an entire chicken. The method places the bird in an ideal position for grilling while providing a flavorful, inventive moisture source underneath. Try experimenting with any soda or beer you might like. You’re guaranteed a juicy chicken with a unique grilled flavor. Hope you enjoyed the bloggers Grilling a Beer-Can Chicken!
Source: eReplacementParts Blog
Author: John Thomas
Our culinary crew tested this recipe on open fire pit! Below are our results:
The culinary crew tested this recipe on an open pit cooking area using Smokinlicious® Double Filet! We were satisfied with the outcome and are passing on this recipe to you!