kahbobs on the grill

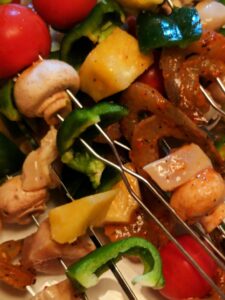
Shrimp and steak Kabob on the grill from our Guest blogger

Our guest blogger for this recipe

Author Bio

Abigail Murphy is a Community Outreach at Lobster Anywhere, a mail-order seafood company based in New England.


listen to this blog

Summer is fast approaching, and that means it’s time to dust off the grill and prepare it for delicious meals that can only be cooked and enjoyed outdoors. Long story short, grilling shrimp & steak kabobs are a great appetizer worth learning how to prepare and serve at this year’s summer parties—and even serve as the main dish, because who doesn’t want to have shrimp & steak kabobs during summer?

For one, kabobs are a versatile meal. Sure, you can get chicken, cherry tomatoes, and nothing else and call it a kabob, but you can add fruit, meat, and veggies to your liking. We’ll go with a fresh Maine shrimp and steak for our recipe because it’s a hearty combination of protein.

Yep, Maine shrimp is a fantastic summer seafood option. They come with a firm texture and sweet flavor and are very low in cholesterol and fat. You can sauté them with garlic and olive oil or use them in salads, soups, and casseroles.

Step 1 for Shrimp & Steak Kabobs: Prep the Steak

Timing is everything, so start prepping your items in advance. Cut the steak into 1-inch cubes and marinate in a ziplock bag or bowl with two tablespoons of olive oil, two tablespoons of Worcestershire sauce, one tablespoon of lemon juice, and pepper, and one teaspoon of garlic powder and dried oregano. Add a pinch of cayenne pepper. Let it sit for an hour.

Use any cut you prefer, as most people like to use sirloin steak because it has a less fat content and is usually a little cheaper. You can also use cilantro in this recipe because it goes well with seafood, but parsley would be a good substitute if you don’t like cilantro. You could also add other veggies like cherry tomatoes or red onion to the skewers if you want them.

Step 2: Move on to the Shrimp

While the steak is marinating, you can prepare the shrimp. After washing them thoroughly under running water, remove their heads and shells by pulling on the head until it pops off. Then peel away the shell from top to bottom. Rinse again to remove any additional covers and pat dry before cutting a small slit down the center vein on the backside of each shrimp. This will help keep them from curling up when they go onto the skewers.

The key to grilling shrimp is making sure they don’t stick to the grill grates and overcook them. We recommend adding just enough olive oil, so the shrimp are lightly coated without being saturated. Rub seasonings into the shrimp until they stick. This helps prevent the spices from falling off.

The shrimp in this meal can be used fresh or thawed from frozen, but either way should have the heads removed. Fresh shrimp is a little messier and will take more time to peel, but you should be able to find it prepared at most seafood markets.

What Type of Skewers Should I Use for Your Shrimp & Steak Kabobs?

When it comes to skewers, cooks typically use bamboo skewers. The only problem with bamboo skewers is that they need to be soaked in water before using, or they will burn. If you don’t want to deal with soaking them ahead of time, use metal skewers instead.


Step 3: Cooking Time

Next, cook the steak long enough to brown it on high heat. Then reduce the heat to low, simmer the steak, and add the shrimps later because they need less cooking time, and trust us, you don’t want to overcook shrimp.

You can assemble the Kabobs when the meat is “rare.” Alternate the items on skewers and grill or broil—brush kabobs with lemon basting sauce. Serve rice, or you can cook some corn on the cob.

Final Thoughts

And there you have it! If you’re looking for a fresh, fun meal to make on the grill, you can’t go wrong with these kabobs. The shrimp is spicy, while the steak is wonderfully juicy and flavorful. The great thing about this recipe is that it’s super simple and tastes fantastic. Plus, when grilling season starts in earnest, having recipes like this on hand will come in handy. Enjoy delicious shrimp & steak kabobs!


Our gorgeous color on our Grilled Prime Rib with wood on the gas Grill- Yum!

Our gorgeous color on our Grilled Prime Rib with wood on the gas Grill- Yum!

GRILLED PRIME RIB THE ULTIMATE WITH WOOD

Listen to our blog

#smokinlicious

Yes, prime rib is expensive and likely the reason so many are fearful to take this cut of beef to the grill. I’m going to take away that fear and show you just how your grill will respect this cut and produce the tender, buttery, crusty outside roast you want.

Although there are different opinions on whether to make a roast with the ribs intact or removed, I am someone who prefers to cook with the ribs in. I’ll give you tips on doing a boneless version as well if that is your preference.

(more…)

Smoked Ham On The Grill Made Easy By Following a Few Tips

Smoked Ham On The Grill Made Easy By Following a Few Tips

SMOKED HAM ON THE GRILL Click To Tweet

Listen to our blog


Whether you’re preparing ham for a holiday like Easter, Christmas or New Year, for a formal brunch or even for a family special event like a reunion, Christening, or engagement party, you can take this average protein and make it so much more. Even if the ham you purchase has already been smoked, you can take away the factory flavor and truly make it your own with our simple technique for smoking on a gas grill using a two-zone cooking method. Plus, I’ll give you a ham glaze recipe that will make you forever throw away a prepackaged glaze.

Get your gas grill ready, purchase a ham, and bring your game as I give you the easy steps to smoking a ham on the gas grill with wood chunks.

(more…)

Passing it on great you tube channel

follow this wonderful you tube channel sharing heritage recipes


Listen to our blog


One of the best perks of working with food is the reach you can have with others. It may be:

  • sparking someone’s interest in trying a recipe
  • providing a solution to a problem they are encountering at the grill
  • or just giving them the initial spark to get going in the kitchen or at the grill.

When SmokinLicious® was approach by Clinton of Durban, South Africa to make a contribution to his channel, we were all game!

A Unique Channel About Family Tradition

Passing It On is a unique channel. At its core is the commitment to passing on family recipes that might otherwise be lost. SmokinLicious® may not always incorporate a family recipe in our episodes. But, we are focusing on the earliest method of cooking. Cooking by wood fire! Passed on from our caveman ancestors.

You’ll be introduced to recipes that have some connection to our blended American families. Since America is made of diverse heritage from all over the globe, the food will be just as diverse.

You get great recipes and different ways to prepare them, including on the outdoor grill or on the stove top using a home made smoker pot. Start using natural hardwood as an ingredient.

Subscribe To The Passing It On

We are so excited to work with the great team at Passing It On! We are ready to pass on our food and drink recipes with that special wood-fired flavour twist. Enjoy!

You can find our episodes posted weekly at: https://www.youtube.com/c/passingiton


Dr Smoke invites you to follow this wonderful you tube channel where they share heritage recipes.

Dr Smoke invites you to follow this wonderful you tube channel where they share heritage recipes.

Dry Rubbed Chicken Drumsticks after being "kissed" with smoke from the smoker box with Double filet wood chunks!

Dry Rubbed Chicken Drumsticks after being “kissed” with smoke from the smoker box with Double filet wood chunks!

SALT-FREE DRY RUBBED CHICKEN DRUMSTICKS

listen to this blog


You’ve likely heard about limiting your ingestion of chicken skin which can add unnecessary calories and saturated fat. On the flip-side, chicken skin also adds to the overall flavor and moisture of chicken. Here’s the thing: if you limit the amount of chicken skin you ingest, it contains a good amount of unsaturated fat that can be heart healthy, which you may not be benefiting from.

(more…)

mermelada de tocino ahumado

mermelada de tocino ahumado

Escucha el Blog


Mermelada de Tocina Ahumado- Haciendo el tocino

Comience con 1-1/2 libras de tocino ahumado, preferiblemente su propio tocino ahumado, y córtelo transversalmente en trozos de 1 pulgada. Coloque las piezas de tocino ahumado cortados en una sartén grande, colocada a fuego medio-alto. Cocine, revolviendo ocasionalmente, hasta que la grasa derrite y el tocino esté ligeramente dorado (casi 20 minutos). Con una espumadera, transfiera el tocino cocido a toallas de papel para vaciar. Vierta todas las cucharadas de grasa de la sartén excepto 1 cucharada y agregue 2 cebollas amarillas medianas que hayan sido cortado en cubos pequeños y 3 dientes de ajo que hayan sido peladas y destrozadas. Cocine la cebolla y el ajo hasta que estén translúcidos, por unos 6 minutos. Agregue 1/2 taza de vinagre de manzana, 1/2 taza de azúcar moreno repleto, 1/4 de taza de jarabe de arce puro y 3/4 de taza de café preparado. Lleve a punto de ebullición, revolviendo y raspando los lados de la sartén. Agregue el tocino ahumado y revuelva para combinar.

Mermelada de Tocina Ahumado- Cocinando para perfección

Aquí está el paso que asegura una consistencia similar a un atasco. Es hora de transferir la mezcla a una olla de cocción lenta de 6 cuartos y cocinar en alto, sin tapa, hasta que el líquido se vuelva jarabe. Esto tomará alrededor de 3-1/2 a 4 horas. Si no tiene una olla de cocción lenta, puede cocinarla en el horno hasta que se alcance la consistencia con una temperatura de 300 oF. Una vez lista, transfiera la mezcla a un procesador de alimentos y pulse hasta que se pique en picado grueso. Dejar enfriar, luego refrigerar en recipientes herméticos durante un máximo de 4 semanas.

No se olvide, además de hacer un gran aperitivo para los huéspedes, este es un súper anfitrión o regalo de vacaciones. ¡Simplemente agregue su pan favorito, baguette, incluso panqueques, y disfrute!

¿Cuál es su receta favorita con tocino ahumado casero? Déjanos un comentario para opinar y suscríbelo para obtener todas nuestras publicaciones sobre consejos, técnicas y recetas. Aportando innovación a la cocina a fuego de madera con recetas, técnicas y la ciencia detrás del fuego, el humo y el sabor. Eso es SmokinLicious®.

SmokinLicious® Productos utilizados para esta receta:

Fragmentos de madera- doble o filete único

Our hand split double filet smoker wood chunks

Más recetas que puede disfrutar:

Recetas similares a la mermelada de tocino ahumado

Si te gusta esta receta de mermelada de tocino ahumado, prueba estas

Costillas cortas ahumados de carne de res con adobo de soya

Crostini con espárrago ahumado

Jamón ahumado en la parrilla de gas

Mermelada de tocino ahumado es la manera perfecta para usar el tocino sobrante.

Our homemade smoked bacon, lettuce and fresh tomatoes for our smokey BLT Salad

Our homemade smoked bacon, lettuce and fresh tomatoes for our smokey BLT Salad

Listen to our blog


We know smoked bacon is a favorite which is why we wanted to include a great recipe for fresh produce you may have available. This is our take on the BLT salad featuring smoked bacon, homegrown lettuce and tomatoes, as well as a homemade dressing and Naan croutons. Don’t forget to check out our technique on smoking pork belly which is super easy and fast for the ultimate homemade smoked bacon.

Smokey BLT Salad- Dressing First

(more…)

Jamón ahumado en la parrilla de gas hecho fácil siguiendo algunos consejos

Jamón ahumado en la parrilla de gas hecho fácil siguiendo algunos consejos

Jamón ahumado en la parrilla de gas

Escucha el Blog


Si que prepare jamón para unas vacaciones como Pascua, Navidad o Año Nuevo, para un brunch formal o incluso para un evento especial familiar como una reunión, bautizo o fiesta de compromiso, puede tomar esta carne y hacerla mucho más. Aun si el jamón que compra ya ha sido ahumado, puede hacerlo suyo con nuestra técnica sencilla para ahumar en una parrilla de gas utilizando un método de cocción de dos zonas.

Prepara su parrilla de gas y compra un jamón mientras se doy los pasos fáciles para ahumar un jamón en la parrilla de gas con trozos de madera.

Grandes ingredientes para un gran glaseado

Muchos de los jamones ahora vienen con una variedad de etiquetas, así que es importante que los distinguimos. Los jamones curados húmedos ya están ahumados, pero aún deben cocinar para matar microbios si están etiquetados como “cocineros antes de comer” o necesitan algo de cocción si están etiquetados como “cocidos”. Estos son generalmente para la compra en su entero, medio o jamón hueso de pierna. Los jamones curados en seco se han curado en una gran cantidad de sal y por lo general necesitan ser empapados en agua helada antes de cocinar, lo que elimina gran parte de la sal por lo que es más comestible. El jamón fresco no se cura y no se cocina.

No importa a cualquier tipo de jamón, necesitará un glaseado para dar a sabor a la carne. Para mi jamón, estoy haciendo un glaseado de albaricoque-dijon que es tan sabroso y simple. Para mi glaseado necesitará los siguientes ingredientes:

  • 1/2 taza de conservas de albaricoque
  • 1/2 taza de miel
  • 2 cucharadas de azúcar morena
  • 1 cucharada de mostaza al estilo dijon
  • 1-1/2 cucharaditas de salsa Worcestershire
  • 1/2 cucharadita de salsa de soja
  • 1/2 cucharadita de pimentón, prefiero el estilo español
  • 1/4 de cucharadita de pimienta de cayena
  • 1/4 de cucharadita de pimienta negra
  • 1/2 cucharadita de canela
  • 1/8 cucharadita de clavo molido

En un tazón mediano, combine los ingredientes del glaseado y mezcle bien. Refrigere hasta que lo necesite.

Ahúme primero

Todos nuestros ingredientes de albaricoque se mezclan y listos para baste nuestro jamón.

He discutido los diferentes tipos de jamón y que la mayoría en los supermercados están precocinados, a menudo, usted encontrará que son ahumados también. No deje que esto se impida ahumar la carne en su propio. Para empezar, tendrá que recortar la grasa que está presente en el jamón pre ahumado. Eso significa, recortar dentro de pulgada y media. Recuerde, el vapor de humo no penetrará a través de la grasa. Después de recortar, tendrá que hacer cortas en la carne en un diseño ajedrezado. Esto se hace mediante la producción de cortes de cuchillo de aproximadamente 1/4 de pulgada de profundidad primero en la vertical y luego horizontalmente, dejando alrededor de 1 pulgada de espacio entre los cortes

Preparando la parrilla de gas

Para esta receta en nuestra parrilla, utilizamos un enfoque de dos zonas; calor aplicado debajo del trozo de madera filite unico de SmokinLicious para ahumar y sin calor debajo del jamón.

Después es hora de preparar la parrilla de gas. Encienda los quemadores en un lado de la parrilla y ajuste a fuego alto medio. Mantenga una temperatura de cocción de unos 275 grados Fahrenheit. Deje la otra mitad de los quemadores fuera, ya que será el área de cocción para el jamón. Esto se conoce como una configuración de cocina de dos zonas. Coloque 2 trozos de madera de filete único de SmokinLicious® directamente en el escudo térmico del quemador encendido. Estos calentarán y emitirán el vapor y dar sabor al jamón. El tiempo total de cocción del jamón de esta manera será de unos 30 minutos. El jamón se colocará en la mitad fría de la parrilla con el lado plano del jamón en la rejilla.

Después de 30 minutos, tome dos hojas largas de papel de aluminio y coloque el jamón en la lámina. Tome su glaseado y cubra el jamón con aproximadamente la mitad de la mezcla. Ahora, dobla la lámina alrededor del sellado del jamón en la parte superior. Coloque el jamón envuelto en papel de aluminio en el lado frío de la parrilla e inserte un termómetro de carne en la carne al menos a 1 pulgada de distancia del hueso si tiene un corte de jamón deshuesado. Cocine hasta que el termómetro lea 130 grados Fahrenheit. Cada 15 minutos, cepilla el jamón con glaseado goteando que se han recogido en la parte inferior de la lámina. Después de cocinar a 130 grados Fahrenheit, retirar el jamón de la lámina, escurrir el glaseado residual de nuevo en una cacerola con el glaseado restante sin cocinar que había reservado y dejar que se caliente a fuego lento.

Paso final a la piel crujiente

Coloque el jamón desenvolver en la parrilla caliente para crujiente la piel externa. ¡Ten cuidado de no cocinar demasiado!

Después de retirar de la lámina, hay un último paso antes de servir. La piel requiere sólo un poco de crujiente que se hará en el lado caliente de la parrilla. Coloque un lado del jamón en el lado caliente de la parrilla permitiendo que los azúcares de glaseado se caramelicen durante unos minutos por lado. No haga el lado plano del jamón y no permita que los azúcares se quemen. Una vez hechos los tres lados, retírelo a una tabla de cortar y corte. Sirva el glaseado residual en el lado.

Se da simplemente maneras de traer sabores de leña excepcionales a sus alimentos favoritos. Comparte sus fotos y sus comentarios suscribiéndote a nuestro canal. Síguenos y obtén consejos, técnicas, recetas y la ciencia detrás del fuego.

Productos SmokinLicious® utilizados en esta receta:

Trozos de madera: Filete único

Foto de nuestros trozos de madera especial usó en jamón ahumado

#trozosdemadera


Chunk hombre: Para más lecturas relacionadas con jamón ahumado en la parrilla de gas

Chunk hombre: Para más lecturas relacionadas con jamón ahumado en la parrilla de gas

Dr. Smoke- ¡pruebe jamón ahumado en la parrilla de gas!

Dr. Smoke- ¡pruebe jamón ahumado en la parrilla de gas!

Using our Homemade Bacon, try this smoked bacon potato cheddar round for a yummy meal or snack!

Using our Homemade Bacon, try this smoked bacon potato cheddar round for a yummy meal or snack!

Listen to our blog

Smoked Bacon Potato Cheddar

At SmokinLicious®, we understand how much people love bacon, especially the smoked version. That’s why we encourage you to make your own smoked bacon using a pork belly between 3-5 lbs. This amount will provide for more than a few great recipes as well as enjoyment by the slice. You can find our method of making smoked homemade bacon here.

(more…)

Our Smoked Bacon Jam recipe a tasty spread for any meal!

Our Smoked Bacon Jam recipe a tasty spread for any meal!

Listen to our blog

I love introducing you to options with a common food item that you may have never thought of. Bacon, especially the smoked variety, is something that can be easily incorporated into so many recipes as either the star ingredient or a featured player. Be sure to check out my technique for curing and smoking your own bacon which is easy and by far, more delicious than any store-bought bacon.

Most definitely, today’s recipe has bacon in the starring role- Smoked Bacon Jam! I consider this the perfect recipe for an easy appetizer and recommend you keep a jar or two around during the busy holiday period or for those spur-of-the-moment guest pop ins.

Smoked Bacon Jam- Rendering Smoked Bacon

(more…)

Next Page »