Whenever we reach the transition between Winter and Spring, I like to start transitioning my meals from hearty comfort foods to a bit more health conscious to prepare for the “less clothes” season coming. Since I’m in the southwestern portion of New York State, our warmer temperatures can be a long way away from the calendar date of the first day of Spring.
SUCCULENT WOOD FIRED STUFFED TOMATO WITH HERB RICE
It’s tomato season! Boy, do we have a great technique for you to try on your charcoal grill as well as a tasty recipe to make- wood fired stuffed tomato.
Bring 8 large tomatoes in from the garden or purchased at the fresh market, clean out the charcoal grill, fire pit, or fireplace, and give a few hours to a great cooking experience and exceptionally flavorful recipe.
We are going French with a zucchini & ricotta galette that is simply out of this world. With ember fired zucchini we previously cooked on our charcoal grill with straight wood, this is one recipe worth making any time of year. Get 2 zucchini ember cooked and prepare yourself for the ultimate in wood fired flavors featuring summer zucchini!
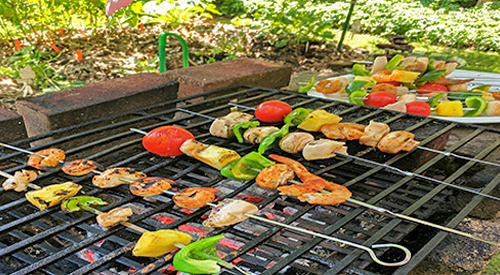
Having the experience of viewing her dad, our youngest staff member tried her hand at grilling for the first time! Look how great these Kabobs look!
MY FIRST EXPERIENCE AT THE CHARCOAL GRILL (by the intern)
I’ve had a lot of experience over the years watching my Dad at our homemade barbecue pit. I’ve never had the experience of doing the actual prep and cooking until now.
I’m taking on the grill and preparing some kabobs using charcoal and wood. This is my first attempt at cooking on the charcoal grill without any help. Learn what worked and didn’t work for me, a 20 year old who tackles the fire!
Selecting My Menu
In deciding on a menu and given that it is the hot summer in the East, I went with kabobs. Shrimp and chicken were selected as proteins and an assortment of vegetables plus pineapple for sweet.
I purchased fresh, de-veined shrimp to cut down on some prep time. After washing the shrimp, I laid them out on paper towels and pat dry with additional paper towels. To get a good char on the shrimp, I’ve read how important it is to get as much water out of the shrimp.
Something I learned after: I should have sprinkled a little kosher salt to aid the water removal.
For my chicken, I purchased chicken breasts with the skin already removed and cut these into cubes trying to keep all the pieces the same size for even cooking.
Protein Preparation
I wanted a little spice to the menu so I elected to use a Cajun seasoning on my shrimp. I made sure every piece was coated well.
Something I learned after: if I had prepared these even a few hours early, I could have sealed them in a storage bag and let them really infuse the flavor. For my chicken cubes, I marinated in a simple preparation of Italian salad dressing. This protein I did marinate overnight.
Other Preparation
I decided to incorporate more traditional items for my kabobs like tomato, pepper, mushroom and pineapple. I do a simple wash of the vegetables, then cut peppers and pineapple into even pieces big enough to be skewered. Button mushrooms are left whole as are my small tomato rounds. I make sure everything is at the ready to make assembly easy. I think this step in the kabob making was relatively easy to manage.
Kabob Assembly
As you can see, I did a bit of variation to my assembly process for the kabobs. I did mix my vegetables and fruit on a single skewer as well as my two proteins.
Something I learned after: I should have first oiled the skewer to ensure ease in removal of the food items once cooked. I also should have made skewers with the same food item on them so I could control the timing each item takes to cook. So, next time I will have full skewers of mushroom caps, full skewers of pepper, full skewer of shrimp, etc.
Charcoal Barbecue Setup
My barbecue is an open pit style, hearth level, hand built by my Dad. When cooking, we generally use charcoal or charwood with wood chunks and chips for flavor. Today, I went with Sugar Maple chunks (double filet size), for the kabobs. I learned the importance of starting a chimney starter of charcoal first to be sure all the coals are hot before they go into the charcoal area of my pit.
Something I learned after: if your grill is in a safe area, you can start the chimney starter while preparing the food items so by the time you get everything prepped, the coals are hot and ready to go.
Once my embers are burning red and starting to gray over, it’s time to pour them into the chimney brazier. My pit will hold about 6 lbs. of charcoal. Once the charcoal is in, I add my Sugar Maple wood chunks for flavor to the kabobs.
Something I learned after: I should have laid a bed of unlit coals in the charcoal brazier. That way, I could be sure to have enough heat for the entire cooking process and I would have a chance to use the hot embers later for other cooking.
Time to Grill
With my grilling grates in place, it’s time to add the foods. I ended up putting a series of skewers on the grates trying not to crowd the grates. I did cook some of the chicken and shrimp off the skewers to give my guests options for just extra protein.
Something I learned after: I really didn’t give much thought to the cooking time of each item so some things were cooking faster and drying out before others. Shrimp cooks faster than chicken so lesson learned: chicken needs to go on first. Plus, I need to brush with marinade or oil to keep things moist.
Lessons Learned
For my first ever effort at making kabobs on the charcoal pit, I was pleased with the results. Without question the sugar maple chunks from SmokinLicious®added to the great flavor. I was amazed at just how little wood it took to impart that smoky quality to the foods. I learned quite a bit along the way: my sequence of adding items to the grill needs to change. My longer cook items like chicken, peppers and mushroom need to go on first. That’s where having skewers made with just the one ingredient will really come in handy. Pineapple, tomato, and shrimp certainly take less time. I also need to keep a basting brush and cup at the grill so I can coat the food items either with marinade or oil to keep the moisture locked in the food.
Toasting Marshmallow & Peanut Butter Cup S’more
A great way to use the hot embers leftover when your main dish cooking is done is a simple dessert. Nothing shouts summer and fun like a s’more! Graham cracker, peanut butter cups, and marshmallow fired in the hot embers – oh so yummy good!
I hope you enjoyed this first-time griller’s experience at the charcoal grill. Leave a comment and subscribe to us so we can keep bringing you innovative tips, techniques, and recipes on working with wood for cooking, grilling & smoking.