Our guest blogger provides great insights into grilling a Beer-Can Chicken

Our guest blogger provides great insights into grilling a Beer-Can Chicken

GRILLING A BEER-CAN CHICKEN

Guest Blogger:

Source: eReplacementParts Blog

Author: John Thomas

Beer Can Chicken- The “Wow” Factor:

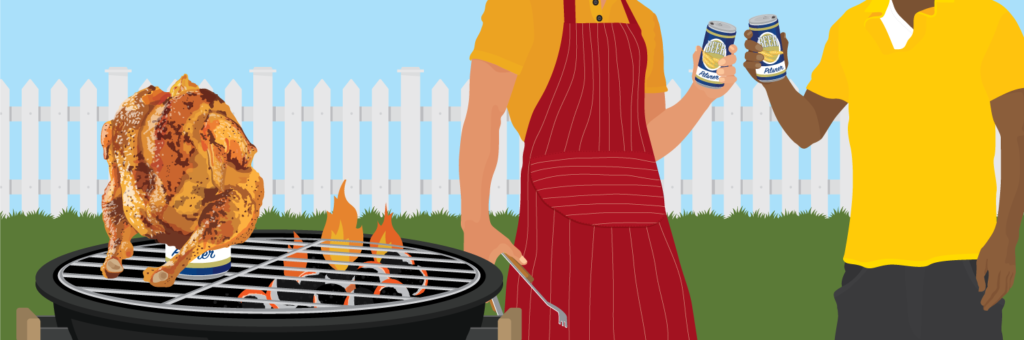
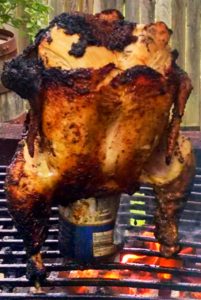
What says “grill master” more than grilling a whole chicken sitting on top of a can of beer that is infusing flavor and moisture into your bird? Beer-can chicken is often overlooked on the menu, but it’s a fun and proven way to grill a tasty whole chicken. Grab a whole chicken from the grocery store and beer or even some root beer or soda and get that thing on the grill for a guaranteed successful meal. This is an easy method for grilling a flavorful and tender chicken that keeps all eyes on the grill and provides that “wow” factor for any cookout you host.

Sure, it’s called “beer-can chicken,” but that doesn’t necessarily mean you have to use beer. There are tons of flavorful canned beverages out there if you are so inclined to something else. Any soda will make your chicken pop, or even an empty can with a little water and garlic. Beers like imperial stouts, pilsners, or lagers are great, but some other fun ideas include orange soda, cola, or root beer. Regardless, pick your favorite beer or soda. The first key to sitting your bird on top of a can is to make sure you start with room temperature beer or soda. You want that liquid to steam and if you start off with a cold beverage, it just might not get hot enough. Second, don’t use a full can. It takes a lot of heat to get that liquid to steam, so empty at least half the can prior to inserting it into the cavity of the chicken.

Tips and Tricks infographics

Beer Can Chicken- Two Recipe Choices:

For those of you who choose not to grill with beer, the first recipe choice offered here is a BBQ root beer chicken. This flavorful bird has a classic BBQ dry rub on the outside and root-beer-infused sweet flavor and moisture on the inside. The bird is brushed with any BBQ sauce you like toward the end of the cooking. After cleaning out the chicken, mix these dry ingredients together and heavily apply this simple BBQ dry rub all over the bird.

Rub infographics

1 tablespoon salt
1 tablespoon brown sugar
1 tablespoon paprika
2 teaspoons black pepper
1 teaspoon garlic powder
1 teaspoon chili powder

Place the chicken on top of a can of root beer and grill as instructed below. If root beer isn’t your thing, orange soda can be substituted in this recipe.

The second recipe is more of a classic beer-can chicken that has a spicy dry rub applied to the outside. A classic pilsner or lager is used to provide moisture and flavor to the bird. The ingredients for the spicy dry rub recipe are as follows:

1 tablespoon kosher salt
5 tablespoons black pepper
2 teaspoons onion powder
1 teaspoon cayenne pepper
1 tablespoon oregano
2 teaspoons thyme
2 teaspoons paprika
1 teaspoon garlic powder
1 tablespoon red pepper flakes

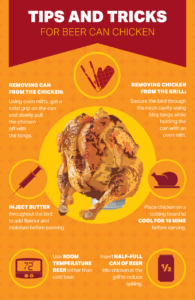
Clean out the bird and heavily apply the dry rub all over the outside. For an extra pop, a poultry butter injection inside the bird is fantastic. Most grocery stores sell a food injection needle set. Melt some butter and inject it into the thickest part of the breast and into the legs and thighs. The buttery flavor can’t be beaten.

Now that you have applied your dry rub to the chicken, set up the grill for indirect heat. For indirect heat, place charcoal on half the grill and cook the bird on the other half, above an aluminum tin to catch drippings. Grilling the chicken at a more moderate temperature reduces the chance of scorching the bird on the outside and undercooking the inside. On a gas grill, ignite the burners on only one side to medium-high heat. You want the grill to be at about 400-425 degrees for grilling a beer-can chicken.

Grilling infographics

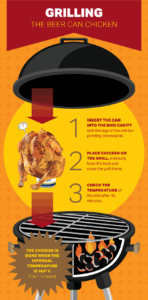
It’s easiest to insert the can into the bird right at the grill to avoid it tipping over inside the house. The legs of the chicken extend down toward the grill and the can is inserted into the cavity between the drumsticks. After the grill is pre-heated, set the chicken, neatly propped up on top of the can, on the indirect heat side of the grill and close the grill dome. After about 45 minutes, check the internal temperature of the bird. The chicken will be done when the internal temperature is 165˚F. It should take about 1 to 1-1/2 hours to fully cook the bird, depending on your grill temperature.

Once your chicken reaches 165 degrees, you’ll need to remove the can and the chicken from the grill. Take some extra care to safely remove the bird from the grill. Use grill tongs placed in the neck cavity to secure the bird from the top while carefully holding the bottom of the can with some oven mitts or pot holders. The can will be hot and you can burn yourself and you don’t want to spill any liquid from the can. Get a solid grip on the can with your oven mitt/pot holder and slowly pull the chicken off the can with your tongs, then place it on a plate or cutting board. Leave the can on or near the grill and allow it to cool. Bring the bird inside for a quick 10-minute rest followed by carving.

Beer-can chicken is a fun way to grill an entire chicken. The method places the bird in an ideal position for grilling while providing a flavorful, inventive moisture source underneath. Try experimenting with any soda or beer you might like. You’re guaranteed a juicy chicken with a unique grilled flavor. Hope you enjoyed the bloggers Grilling a Beer-Can Chicken!

Source: eReplacementParts Blog

Author: John Thomas

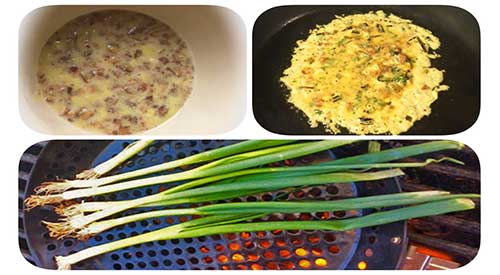
Our culinary crew tested this recipe on open fire pit! Below are our results:

The culinary crew tested this recipe on an open pit cooking area! We were satisfied with the outcome and are passing on this recipe to you!

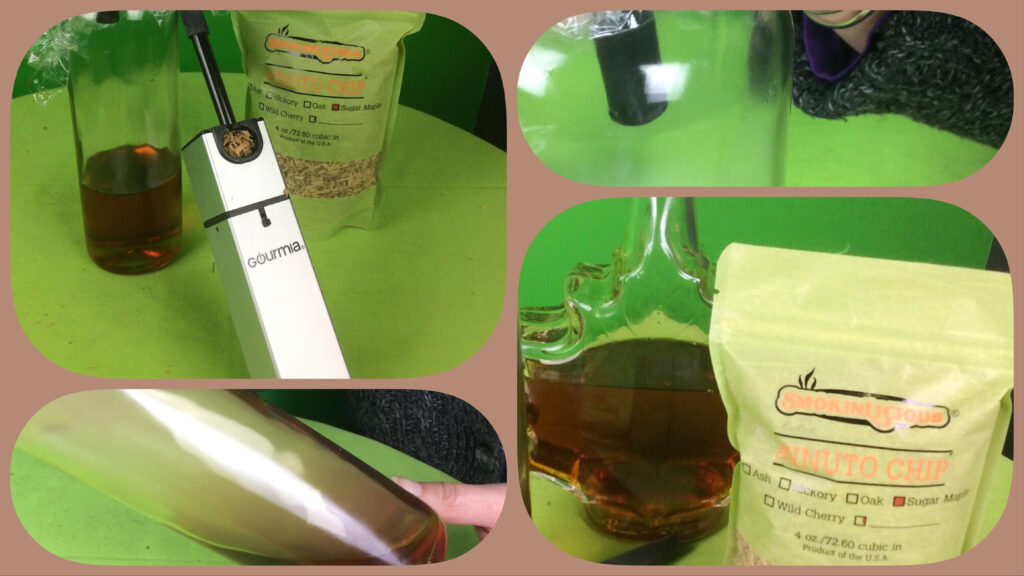
The culinary crew tested this recipe on an open pit cooking area using Smokinlicious® Double Filet! We were satisfied with the outcome and are passing on this recipe to you!

Smokinlicious® Double Filet


Dr Smoke

Dr. Smoke- Our team found this to be an easy recipe “grilling a beer-can chicken” submitted to us as a “guest” blogger! You should try it!

Smoking fruit for cocktails adds a unique taste. Try SMOKED KIWI CAIPIROSKA for your next indoor or outdoor party.

Smoking fruit for cocktails adds a unique taste. Try SMOKED KIWI CAIPIROSKA for your next indoor or outdoor party.

Thinking of Smoking fruit for cocktails? Try SMOKED KIWI CAIPIROSKA Click To Tweet

Listen to our blog

The warmer season means we all look for new cocktails to serve and enjoy during the longer days of sunlight. For those of you who are a fan of the fruity cocktail, why not take a less traditional approach and bring a new flavor level in.

(more…)

Smoking of Spring onions brings a new flavor when you add to a pancake for Spring onion pancake

Smoking of Spring onions for a spring onion pancake.

let's make a yummy Smoked Spring Onion Pancake! Click To Tweet

Listen to our blog

Spring onion is now in season and ready for all your great recipes calling for green onion or chives. Today, we’re going to bring an extra flavor level to this favorite seasonal onion by smoking it first and then incorporating it into a savory “pancake” recipe.

(more…)

NOT JUST ANY MAPLE SYRUP-A New Flavour Twist- Smoked Maple Syrup

NOT JUST ANY MAPLE SYRUP-A New Flavour Twist- Smoked Maple Syrup

Listen to our blog

Smoked Maple Syrup

The Gourmia® Mini Smoker or any handheld smoker is the perfect equipment for those who want to infuse smoke flavor into raw and cooked foods, beverages, herbs, and spices. Using SmokinLicious® Minuto® or Piccolo® Wood Chips ensures maximum flavor infusion from a clean, 100% bark-free hardwood. Select from 8 hardwood species and combine woods for your own customized flavoring.

We are taking a step on the intense side and preparing to smoke pure New York State maple syrup. I am using SmokinLicious® Sugar Maple Minuto® Chips in Size 8. In addition to the smoker and chips, you will need a container to hold the syrup, some plastic wrap and a lighter. Keep in mind, this smoked syrup is not intended to be used on waffles, pancakes, or french toast due to the intense flavoring. Get ready, for a fun, quick way to smoked maple syrup!

So simple to do, cold smoke generators let you direct the smoke just where you want. With the maple syrup placed in a glass bottle, the tubing of the Gourmia® Mini Smoker or any handheld smoker is inserted into the bottle and then sealed with simple plastic wrap. This ensures that all the smoke vapor produced is contained within the bottle and exposed to the syrup. You can fill the smoke to the level you want – just a little or right up to the top like we did. Remove the tubing and tighten the plastic wrap or secure the bottle’s cap, and the flavor infusion begins.

Once the smoke is retained within the bottle, we gentle rotate the bottle, turning the liquid within so that it mixes with the smoke vapor. Remember, the more smoke in the bottle, the stronger the flavor will be as you mix it in. You can see how the amber color of the syrup darkens as it is combined with the smoke vapor. That’s it!

Now, you can take this smoked maple syrup and use it in place of simple syrup for cocktails, add it to marinades and sauces for a balance of flavors that are unique. We will be using this batch in a special maple glaze for pork (see our recipe blog for our recipe and technique).

Unlock your imagination and get smoking with SmokinLicious® and Gourmia®!

For more reading related to

For more reading related to Smoked peaches using our cast iron pan on a gas grill- try these recipes


Purchase Products:

Wood Chips- Minuto®

Dr. Smoke- try this simple technique and make NOT JUST ANY MAPLE SYRUP- but Smoked Maple Syrup!!

Dr. Smoke- Try this simple technique and make NOT JUST ANY MAPLE SYRUP- but Smoked Maple Syrup!!


collage of smoked Broccoli casserole

Collage of Smoked broccoli ingredients to finish product

SMOKED BROCCOLI CASSEROLE WITH APPLE & QUINOA

Summary;

We take our smoked broccoli, add apple, and quinoa for a smoked broccoli Casserole for the best casserole recipes ever! Searching for broccoli vegan or a broccoli vegan recipes the smoky flavor roasting over wood, look no further than this broccoli recipes! Using hardwood chunks on a gas grill is easy, you must try!

Listen to our blog

Once you’ve smoked at least one head of broccoli, you’re ready to use it in this wonderfully flavorful creamy dish. Keep in mind, you can make this a vegan recipe by swapping out all the dairy products for comparable vegan ingredients.

For those looking to make this a main meal, add a protein like chicken or turkey. Simply include the pre-cooked protein when you spread the other ingredients into the prepared oven safe dish.

So, here we go with our smoke broccoli casserole with apples and quinoa.

SMOKED BROCCOLI CASSEROLE- INGREDIENTS:

You will need:

  • 1 cup quinoa, washed
  • 1 head of smoked broccoli, finely chopped
  • 1 cup finely diced apple (like Fiji, Golden)
  • 1 tablespoons olive oil, divided
  • 1/3 cup Panko
  • Salt/fresh ground pepper
  • 2 tablespoons unsalted butter
  • 2 tablespoons all-purpose flour
  • 2 cups milk (may use coconut, almond, cashew or 2%)
  • 1-1/2 cups shredded cheddar cheese, divided
  • 1/3 cup Greek yogurt

SMOKED BROCCOLI CASSEROLE- DIRECTIONS:

Preheat oven to 350° F. Lightly oil or spray a 9×13 baking dish. In a large saucepan, add 2 cups of water and 1 cup of quinoa. Cook according to package directions. With roughly 10 minutes left to finished cook, add the diced apple. Heat 1 tablespoon of oil in a large skillet over medium-high heat. Add Panko and cook, stirring constantly, until browned (about 3 minutes); then remove from heat and set aside. Melt butter in the skillet over medium heat. Whisk in flour until lightly browned. Gradually whisk in milk and cook, whisking constantly until slightly thickened. Stir in quinoa/apple mixture, smoked broccoli, 1 cup of cheese, yogurt, salt and pepper.

quinoa, butter and Apples in a skillet

Quinoa, Butter, and Apples in a skillet

SMOKED BROCCOLI CASSEROLE- PUTTING IT ALL TOGETHER:

Spread broccoli mixture into the prepared baking dish; sprinkle with remaining cheese. Place in oven and bake until cheese has melted and the mixture is warmed through. Sprinkle with browned Panko and serve.

Mixing all ingredients together and putting in baking dish

Mixing all ingredients together and putting in baking dish

SMOKED BROCCOLI CASSEROLE- ADD YOUR PERSONAL FAVORITES:

This recipe can be changed to include some of your other favorites like cubed squash, grapes, cranberries. Or as mentioned earlier, you may add a protein such as chicken or turkey. Simply cook the meat separately in the oven, on the stove top, or on the grill.

You’ll love the balanced smoky flavor of the broccoli with the creaminess of the apple and quinoa. This is soon to be a Fall favorite as you adjust to the cooler temperatures.

Enjoy!


Purchase Products:

Wood Blocks

Dr. Smoke® I like Broccoli so this SMOKED BROCCOLI CASSEROLE is one of my favorite recipes to make!

Dr. Smoke® I like Broccoli so this SMOKED BROCCOLI CASSEROLE is one of my favorite recipes to make!

Bon-Bar-B-Q!


Finished dish of Smoked Broccoli Quina and Apples- Dr Smoke

Finished dish of Smoked Broccoli Quinoa and Apples- Dr. Smoke


Look at this great head of wood fired cauliflower over wood chunks!

Look at this great head of wood fired cauliflower over wood chunks!

Try Wood Fired Cauliflower on Your Gas Grill! Click To Tweet


It’s time to bring your vegetables into grilling season! Nothing beats the smell of a fresh garden vegetable roasting over wood even on an LP/gas grill. Make this the time of the year you’ll get great char wood flavour in your seasonal vegetables.

(more…)

« Previous Page