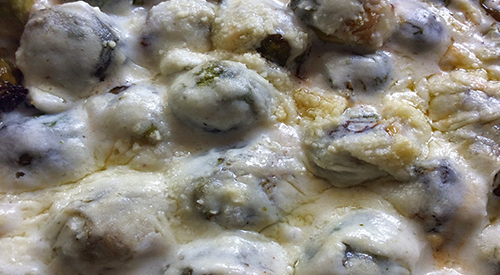
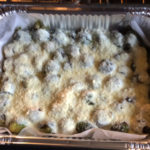
Gratin takes a smoky turn by using smoked brussels sprouts
GRATIN TAKES A SMOKY TURN
Gratin is one of those side dishes that usually gets made at the holidays or for a special occasion dinner. For some reason, it has the stigma of being difficult and time consuming.
Nothing could be further from the truth when you use our gratin recipe.
Most gratin recipes don’t contain a lot of ingredients but the béchamel sauce can be tricky if you don’t stay with your saucepan the whole time. For our gratin recipe you will need:
▪ 2 tablespoons butter
▪ 2 tablespoons flour
▪ coarse salt
▪ fresh ground pepper
▪ 2 cups whole milk
▪ 1/3 cup shredded Asiago cheese
▪ 1/3 cup shredded 2nd cheese like Fontina though I’m using a leek cheese
Béchamel sauce is a fancy name for white sauce that starts with a roux of butter and flour. Begin melting two tablespoons of butter in a saucepan. Once melted we add 2 tablespoons of flour and begin the whisking process. This will produce a thick, paste like consistency. Gradually, add the two cups of whole milk, whisking the entire time. This is the key to a good béchamel sauce. Bring the sauce to a boil then reduce to low heat whisking again. Once thickened, season with salt and fresh ground pepper, and remove from the heat. Add in each cheese, whisking each addition until melted.
Gratin- Layer on the Flavor
Time to lay the smoked Brussels sprouts in a baking dish. Try to use a dish big enough to make one even layer of sprouts. Pour the béchamel sauce over the Brussels sprouts ensuring an evening coating. Take the 2/3 cup of Parmesan cheese and sprinkle over the sauced sprouts. Place the baking dish in a preheated 350°F oven for 25 minutes until bubbling and golden.
The cheese cuts through the mild bitterness of the Brussels sprouts while the smoke flavor adds that special taste bud tingle.
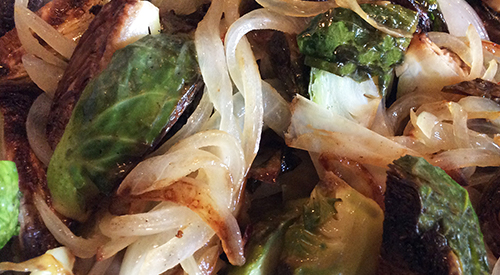
Tortellini Gets a Smoky Mate with the addition of Cherry wood smoked Brussels Sprouts! This is a medley and yummy recipe for the winter blues
TORTELLINI GETS A SMOKY MATE
There is something about the perfect pasta dish that isn’t necessarily loaded with a ton of ingredients. I’ve found that the perfect pasta often features only 2-3 ingredients in addition to seasonings. For me, the perfection is in how each of those ingredients contribute to the overall dish.
This is a pasta dish that features the smokiness of Brussels sprouts paired with the citric acid of lemon peel. Mix in the sweetness of caramelized onion and a full-bodied dish emerges.
Tortellini Gets a Smoky Mate- A Smoky Start
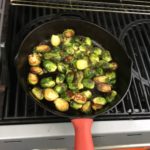
The simplicity of the ingredients is what makes this such a flavorful and pleasurable dish. Start by smoking about a pound of Brussels sprouts – you can see our previous series on how to smoke these on the gas grill, an extremely easy and quick method. Then gather 3 tablespoons butter, 1 medium yellow onion that is thinly sliced, 1 tablespoon extra virgin olive oil or flavored olive oil, 1-1/2 teaspoons Kosher salt, fresh ground pepper, 1 lb. of cheese tortellini, and the zest of 1 lemon. With the Brussels sprouts already smoked, the cooking time for the rest of the dish is about 20 minutes.
Producing Aromatic Flavors
Put a pot of water on for the tortellini to cook according to the packaged directions. What keeps this recipe extra simple is you can use frozen tortellini or fresh packaged rather than making your own and it will be just as spectacular a dish as if you made every ingredient yourself. We start with thinly sliced yellow onion in melted butter, releasing the sweetness of the onion. Once translucent and browning, add the smoked Brussels sprout quarters. Toss together just until the Brussels sprouts heat through.
While the onion and Brussels sprouts cook, our water for the tortellini is salted and brought to a boil. Once at a rolling boil, the pound of cheese tortellini is added. I’m using a frozen variety but you can certainly use fresh. Remember, tortellini is a filled pasta that does not take much time to cook to al dente so don’t turn your back on the pot. It will only be a matter of minutes once the water regains boiling level. Tortellini has the proven sign of being cooked when they float. Once cooked, transfer to a large bowl.
Tortellini Gets a Smoky Mate- Easy Finish
With the tortellini cooked, it’s time to pour the cooked smoky Brussels sprout and onion into the bowl. Once combined, add the tablespoon of olive oil. I’m using a Tuscan flavored olive oil for just a bit more refined flavor but plain EVOO will do. Time to finish this off with fresh ground pepper and salt. The final ingredient – grated lemon zest. Zest right over the bowl. I like a lot of lemon zest so I zest the entire lemon.
After smoking Brussels sprouts using cherry wood, we made a hearty pasta dish that blended the flavors of sweet onion, smoky Brussels sprout, and lemon zest. Added to cheese tortellini gets a smoky mate, this is so flavorful and easy to make. Think of the many variations you can give this dish: adding butternut squash, or zucchini cubes, or perhaps chestnut when in season. Even artichoke hearts. So many opportunities to put your own fingerprint on this dish.
This recipe is sure to give you a great start on incorporating your favorite ingredients. We’d love to hear what you think about our blog post “Tortellini Gets a Smoky Mate” so leave us a comment and subscribe to get all our postings on techniques and recipes. Bringing innovation to wood fired cooking with recipes, techniques and the science behind the fire, that’s SmokinLicious®.
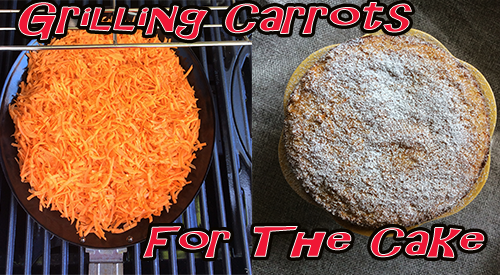
Our Smoked Carrot Cake starts with us grilling our carrots to add a hint of smokey flavor to this vegetable! Then we bake these carrots into a perfect looking cake for our Smoked Carrot Cake!
ROOT VEGETABLE MAKES AWESOME SMOKED CARROT CAKE!
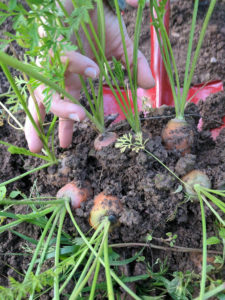
Carrots are ready for picking and for cooking! We’ve got an easy smoking technique that can be done with whole, sliced, even grated carrot. Once smoked, we are taking all that flavor and making an oil-free, carrot-almond cake with ricotta cream.
Smoked Carrot Cake- Nutrition for Your Bones
Carrots are known for their supply of antioxidant nutrients but they are also prized for their benefit to bone mass. Rich in Vitamin A, biotin, vitamin K, fiber and so much more, carrots offer a variety of color options: traditional orange, yellow, white, purple, and red. As they are considered a hardy root vegetable, they tend to keep longer than most other vegetables. On the grill or smoker, they work perfectly at absorbing the level of smoke vapor you want for recipes.
Carrot and Grill Preparation
As carrots are a root vegetable, they can get a lot of dirt on them. It’s important that you wash them well and then pat dry. If you want to smoke your carrots whole, simply trim the ends. My plan is to use these in our smoked carrot cake recipe so I’ll introduce my carrots to the food processor to produce even shredding. Once shredded, I place in a grill safe, flat pan. I’ll be using two SmokinLicious® single filet wood chunks in Wild Cherry to keep the flavor on the mild side. These chunks are placed on a lit burner set to medium-low. Only that burner will be on! Preheat the grill using all burners, then when the carrots go on the grill, turn off all the burners but the one with the wood chunks.
Smoked Carrot Cake- Just a Little Time
As I’ve elected to pre-shred my carrot for the eventual cake recipe, the actual smoking time will be quite short. I don’t want to remove all the water content naturally found in carrot as I want a moist cake. My total cooking time is roughly 15 minutes. If you do want additional smoke flavor without dehydrating your carrots, you can do a handheld food smoker application as well as this a cold smoking technique that will not affect the moisture of the food nor provide any cooking.
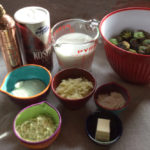
Smoked Carrot Cake- Recipe Time
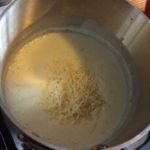
With our carrots wood grilled, it’s time to start with the cake ingredients. Preheat the oven to 375°F. First up, 1-1/2 cups of finely ground almonds, preferably blanched, finely grated lemon zest from 2 lemons, and 2 tablespoons of sugar. If you cannot locate pre-ground almonds, you may use blanched slivered almonds and process in the food processor. Add all three ingredients to the food processor and pulse until a fine, ground consistency is achieved. Time to prepare the 9-inch springform pan. First, butter the bottom and sides. Feel free to add a buttered parchment round to the bottom of the pan if you wish. Then take a small amount of the ground almond mixture and apply to the sides of the pan. Before we start on the cake batter, melt four tablespoons of butter and set aside.
Smoked Carrot Cake- Cake Batter
Now it’s time for the basic dry ingredients for our smoked carrot cake batter. This is a recipe that is oil free. I’ll be using cake flour to bring more lightness to this cake. Here’s what you’ll need for the start of the cake batter
Unbleached cake flour-1-1/4 cups
baking powder-2 teaspoons
salt-¼ teaspoon
sifter
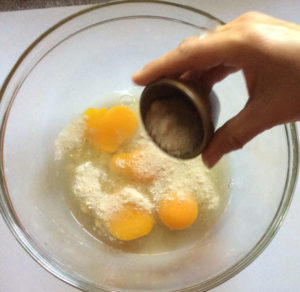
All these ingredients will be sifted into a medium bowl to bring airiness to the cake. Next up, the wet ingredients. You will need:
sugar-¾ cup
4 large eggs
almond extract-¼ teaspoon
Crack the eggs in a large bowl and add the sugar. With an electric mixer set to medium-high speed, beat the egg mixture until pale, foamy, and thickened. Reduce the speed to low and add in the remaining almond mixture, almond extract, and the flour mixture. Once the dry ingredients are incorporated into the cake batter, take the 4 tablespoons of melted butter and pour over the batter, gently incorporating. In goes the smoked, grated carrot – about two cups. Just combine those items and then spread the batter into your prepared 9-inch springform pan. I’ve used the orange carrot for this recipe as they were available in the garden but I prefer yellow carrot for a golden color all the way through the cake.
Baking Time
Reduce the oven temperature to 350°F once the cake is placed on the middle rack (From the preheated oven of 375°F). It will take about 40 minutes to cook through. While it’s baking, I make the ricotta cream. Gather together:
ricotta cheese-1 cup
sour cream-1 cup
honey-2 tablespoons
confectioner’s sugar-2 tablespoons
Grated zest of 1 lemon
Combine all these ingredients and refrigerator until the cake is ready to serve.
Smoked Carrot Cake- Spongy, Light Goodness!
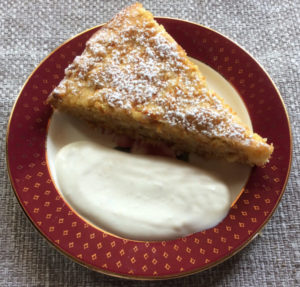
With our cake lightly browned and springing back when touched in the center, it’s ready to come out of the oven and cool. Once the cooled cake can be plated to a cake stand, I take about ¼ cup of confectioner’s sugar and sift the sugar over the cake. Now it’s time to slice this succulent cake and serve our ricotta cream on the side. This is a very subtle smoked carrot so you will not get an overwhelming smoked flavor. In fact, if you don’t tell anyone you smoked the carrot, they likely will never know. Experiment with flavors you like – swap crushed pistachio for the almond, coconut extract for the almond extract. You can even dust with cocoa powder. Anything goes! Don’t forget, only dust the cake with the confectioner’s sugar before you’re ready to serve as this cake is very moist and will increase in moisture as it sits.
Did we spur your imagination with this recipe?
We need your comment and rating, so subscribe and follow us so you don’t miss a thing. We always welcome your suggestions as well on recipes and techniques you want to learn about. SmokinLicious®- your source for all things wood-fired, providing tips, techniques, recipes, and the science behind the fire.
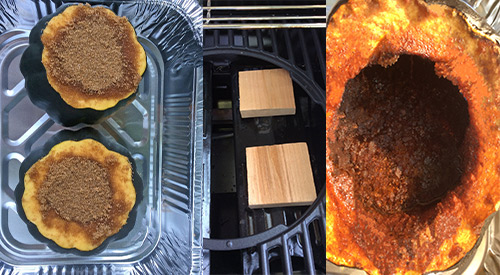
The stages of cooking acorn squash on the grill-stuffing with brown sugar-cooking over wood on the gas grill-finished product!
One of the most popular winter squash that can be found pretty much anytime of the year, acorn squash is rich in fiber and potassium. Time to take this squash favorite and smoke it on the gas grill with cherry wood chunks. But first, we’ll give it some flavorful stuffing to make this exceptionally sweet.
Clean the Acorn Squash
Most acorn squash weigh between 1-2 pounds. After cleaning the outside under running water, cut off the pointed end and ensure the bottom is flat so the squash won’t tip while cooking. Now, scoop out the seeds and membrane until clean, just like you would do with a pumpkin. The seed-free squash is going to be our ingredient vessel that will make the acorn squash so sweet and full of goodness.
Sweeten Things Up
Once the acorn squash is clean of seeds and membrane, it’s time to stuff it. The ingredients are simple: brown sugar mixed with cinnamon and butter. That’s it!
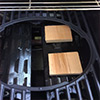
First put approximately ¾ stick of softened butter into the acorn squash center. Then pack in the brown sugar-cinnamon mix. And I mean pack it in! Be sure to press down so the butter and brown sugar mix combine. Once filled, I sprinkle a bit extra of the sugar mixture on the cut top. Now place the acorns in a pan that will be heat safe on the gas grill. Time to prepare the gas grill.
Smoking on the Gas Grill
I’ve turned two burners to “on” of my 4-burner grill. I add two SmokinLicious® Single Filet CherryWood Chunks to one of the heat shields on my grill. Next, I add the acorn squash to a roasting pan and set it on the grate of the grill that has the burners turned “off”. This is known as an indirect method of cooking. The squash will cook until tender all the way through. Depending on the size of the squash, this will take between 1-1/2 to 3 hours. Then get ready for the sweet, buttery smooth squash meat!
A Side Dish or Dessert
Even though the butter was placed to the bottom of our squash and the brown sugar mix on top, the lighter weight of the butter will rise to the surface while the brown sugar mix sinks to the base. These ingredients will mix during cooking to sweeten the squash meat. Once tenderized, remove and allow to cool before handling. Then scrap out the squash meat with the cooked butter-brown sugar mix, combine, and enjoy. This is sweet so you can enjoy it as a side dish or as a dessert – a spoonful on pound cake or puffed pastry is define.
How did we do? Leave a comment, love us, and subscribe. We’re all about wood fired cooking techniques, idea, recipes, and the science behind the smoke and fire.
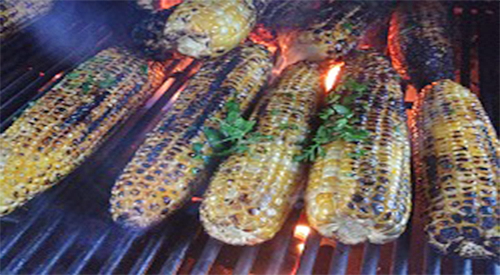
Grilled fresh corn is the one vegetable that you MUST try on any grill!
It’s that time of year! Fresh corn has arrived but not for long. Time to get your hands on a few dozen and do something truly special with this favorite
Grilled Fresh Corn- There’s Nothing Like It!
Yes, you can get corn all year by purchasing in the freezer section of your local grocer. Seriously though. Who wants frozen when by waiting nearly 10 months on the east coast you can have fabulous grilled fresh corn? There is a taste difference between fresh and frozen and boiled and grilled!
On The Grill With Wood For Smoky Char
Corn is one of those vegetables that just begs to be put on the grill. There are many techniques but I prefer to remove the husks and silks, and grill my corn on the cob
with wood chunks on the grill’s heat shields. In answer to the question about soaking the wood in water first – no, I do not do this step as I want my corn kernels to really crackle on the grill. Just see our posting on how to add wood chunks to the LP grill.
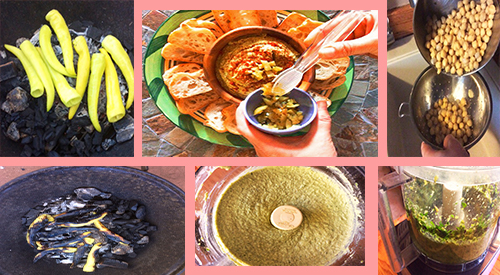
Avocado chocolate pudding kissed by “fire” and “smoke” for an extra boost of flavor!
Avocado has been known for its health benefits for some time and has gone beyond the simple slice or dice and add to your favorite salad. It has become the new replacement for butter in many recipes.
Now, I’m going to do a similar approach to chocolate pudding by incorporating avocado instead of dairy but first, I add a wood-fired flavor to the avocado to bring out a flavor level to this fruit that is distinctly different from its raw flavor. You can see our previous article on the technique we used on the gas grill.
Spicy-char hummus is made by grilling/smoking the hot peppers and then add to your Hummus! Great way to keep the grill flavors when the weather turns colder!
The centuries old Arabic bean dip has gained in popularity substantially over the past few years in United States. Part of the draw is the fact that hummus is high in protein and fiber, and low in fat.
Whenever we reach the transition between Winter and Spring, I like to start transitioning my meals from hearty comfort foods to a bit more health conscious to prepare for the “less clothes” season coming. Since I’m in the southwestern portion of New York State, our warmer temperatures can be a long way away from the calendar date of the first day of Spring.
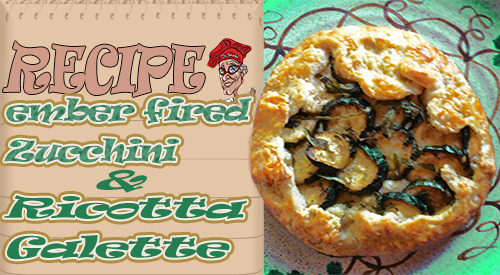
We are going French with a zucchini & ricotta galette that is simply out of this world. With ember fired zucchini we previously cooked on our charcoal grill with straight wood, this is one recipe worth making any time of year. Get 2 zucchini ember cooked and prepare yourself for the ultimate in wood fired flavors featuring summer zucchini!
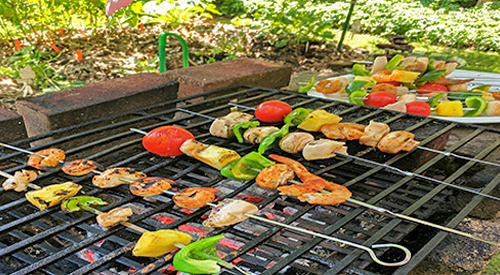
Having the experience of viewing her dad, our youngest staff member tried her hand at grilling for the first time! Look how great these Kabobs look!
MY FIRST EXPERIENCE AT THE CHARCOAL GRILL (by the intern)
I’ve had a lot of experience over the years watching my Dad at our homemade barbecue pit. I’ve never had the experience of doing the actual prep and cooking until now.
I’m taking on the grill and preparing some kabobs using charcoal and wood. This is my first attempt at cooking on the charcoal grill without any help. Learn what worked and didn’t work for me, a 20 year old who tackles the fire!
Selecting My Menu
In deciding on a menu and given that it is the hot summer in the East, I went with kabobs. Shrimp and chicken were selected as proteins and an assortment of vegetables plus pineapple for sweet.
I purchased fresh, de-veined shrimp to cut down on some prep time. After washing the shrimp, I laid them out on paper towels and pat dry with additional paper towels. To get a good char on the shrimp, I’ve read how important it is to get as much water out of the shrimp.
Something I learned after: I should have sprinkled a little kosher salt to aid the water removal.
For my chicken, I purchased chicken breasts with the skin already removed and cut these into cubes trying to keep all the pieces the same size for even cooking.
Protein Preparation
I wanted a little spice to the menu so I elected to use a Cajun seasoning on my shrimp. I made sure every piece was coated well.
Something I learned after: if I had prepared these even a few hours early, I could have sealed them in a storage bag and let them really infuse the flavor. For my chicken cubes, I marinated in a simple preparation of Italian salad dressing. This protein I did marinate overnight.
Other Preparation
I decided to incorporate more traditional items for my kabobs like tomato, pepper, mushroom and pineapple. I do a simple wash of the vegetables, then cut peppers and pineapple into even pieces big enough to be skewered. Button mushrooms are left whole as are my small tomato rounds. I make sure everything is at the ready to make assembly easy. I think this step in the kabob making was relatively easy to manage.
Kabob Assembly
As you can see, I did a bit of variation to my assembly process for the kabobs. I did mix my vegetables and fruit on a single skewer as well as my two proteins.
Something I learned after: I should have first oiled the skewer to ensure ease in removal of the food items once cooked. I also should have made skewers with the same food item on them so I could control the timing each item takes to cook. So, next time I will have full skewers of mushroom caps, full skewers of pepper, full skewer of shrimp, etc.
Charcoal Barbecue Setup
My barbecue is an open pit style, hearth level, hand built by my Dad. When cooking, we generally use charcoal or charwood with wood chunks and chips for flavor. Today, I went with Sugar Maple chunks (double filet size), for the kabobs. I learned the importance of starting a chimney starter of charcoal first to be sure all the coals are hot before they go into the charcoal area of my pit.
Something I learned after: if your grill is in a safe area, you can start the chimney starter while preparing the food items so by the time you get everything prepped, the coals are hot and ready to go.
Once my embers are burning red and starting to gray over, it’s time to pour them into the chimney brazier. My pit will hold about 6 lbs. of charcoal. Once the charcoal is in, I add my Sugar Maple wood chunks for flavor to the kabobs.
Something I learned after: I should have laid a bed of unlit coals in the charcoal brazier. That way, I could be sure to have enough heat for the entire cooking process and I would have a chance to use the hot embers later for other cooking.
Time to Grill
With my grilling grates in place, it’s time to add the foods. I ended up putting a series of skewers on the grates trying not to crowd the grates. I did cook some of the chicken and shrimp off the skewers to give my guests options for just extra protein.
Something I learned after: I really didn’t give much thought to the cooking time of each item so some things were cooking faster and drying out before others. Shrimp cooks faster than chicken so lesson learned: chicken needs to go on first. Plus, I need to brush with marinade or oil to keep things moist.
Lessons Learned
For my first ever effort at making kabobs on the charcoal pit, I was pleased with the results. Without question the sugar maple chunks from SmokinLicious®added to the great flavor. I was amazed at just how little wood it took to impart that smoky quality to the foods. I learned quite a bit along the way: my sequence of adding items to the grill needs to change. My longer cook items like chicken, peppers and mushroom need to go on first. That’s where having skewers made with just the one ingredient will really come in handy. Pineapple, tomato, and shrimp certainly take less time. I also need to keep a basting brush and cup at the grill so I can coat the food items either with marinade or oil to keep the moisture locked in the food.
Toasting Marshmallow & Peanut Butter Cup S’more
A great way to use the hot embers leftover when your main dish cooking is done is a simple dessert. Nothing shouts summer and fun like a s’more! Graham cracker, peanut butter cups, and marshmallow fired in the hot embers – oh so yummy good!
I hope you enjoyed this first-time griller’s experience at the charcoal grill. Leave a comment and subscribe to us so we can keep bringing you innovative tips, techniques, and recipes on working with wood for cooking, grilling & smoking.


 he simplicity of the ingredients is what makes this such a flavorful and pleasurable dish. Start by smoking about a pound of Brussels sprouts –

 Carrots are ready for picking and for cooking! We’ve got an easy smoking technique that can be done with whole, sliced, even grated carrot. Once smoked, we are taking all that flavor and making an oil-free, carrot-almond cake with ricotta cream.
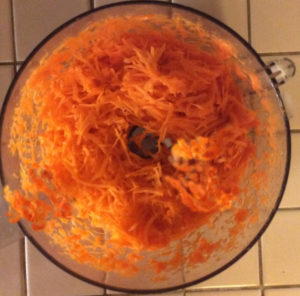 shredded, I place in a grill safe, flat pan. I’ll be using two
 Crack the eggs in a large bowl and add the sugar. With an electric mixer set to medium-high speed, beat the egg mixture until pale, foamy, and thickened. Reduce the speed to low and add in the remaining almond mixture, almond extract, and the flour mixture. Once the dry ingredients are incorporated into the cake batter, take the 4 tablespoons of melted butter and pour over the batter, gently incorporating. In goes the smoked, grated carrot – about two cups. Just combine those items and then spread the batter into your prepared 9-inch springform pan. I’ve used the orange carrot for this recipe as they were available in the garden but I prefer yellow carrot for a golden color all the way through the cake.
 Did we spur your imagination with this recipe?

 is rich in fiber and potassium. Time to take this squash favorite and
 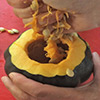 the seeds and membrane until clean, just like you would do with a pumpkin. The seed-free squash is going to be our ingredient vessel that will make the acorn squash so sweet and full of goodness.
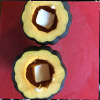 First put approximately ¾ stick of softened butter into the acorn squash center. Then pack in the brown sugar-cinnamon mix. And I mean pack it in! Be sure to press down so the butter and brown sugar mix combine. Once filled, I sprinkle a bit extra of the sugar mixture on the cut top. Now place the acorns in a pan that will be heat safe on the gas grill. Time to prepare the gas grill.
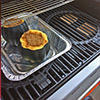 the burners turned “off”. This is known as an indirect method of cooking. The squash will cook until tender all the way through. Depending on the size of the squash, this will take between 1-1/2 to 3 hours. Then get ready for the sweet, buttery smooth squash meat!
 cool before handling. Then scrap out the squash meat with the cooked butter-brown sugar mix, combine, and enjoy. This is sweet so you can enjoy it as a side dish or as a dessert – a spoonful on pound cake or puffed pastry is define.