Flank steak pinwheels- with asparagus as the lead, all ingredients are mixed with the flank steak wrapped and tied for grilling.

Flank steak pinwheels- with asparagus as the lead, all ingredients are mixed with the flank steak wrapped and tied for grilling.

Great recipe idea with the use of Ember cooked Asparagus and Flank Steak. Click To Tweet


(more…)

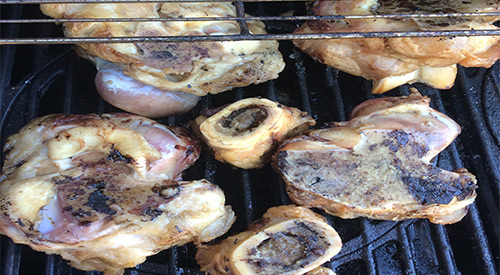
Our Smoked Bone Broth starts with Great Beef bones trimmed on the gas grill

Our Smoked Bone Broth starts with Great Beef bones trimmed on the gas grill

SMOKED BONE BROTH FOR HEALTH & FLAVOR Click To Tweet

Summary:

Smoked beef bones by using cooking wood chunks over the grill heat shields or gas grill diffusers are easy! The smoke flavor and slow simmer root vegetables are building flavor profiles for this unique smoked bone broth recipe. Simmering food with aromatic vegetables sometimes lacks taste that smoking wood chunks add. Read how easy it is!

listen to this blog


(more…)

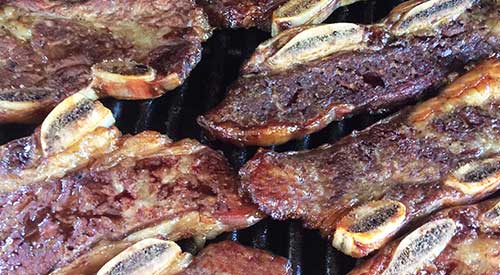
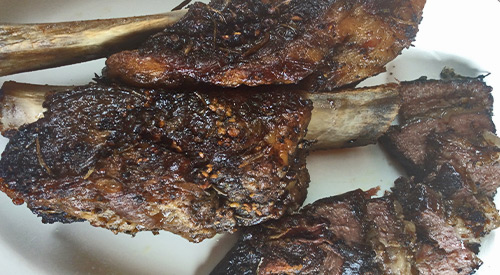
Our Finished Smoked Beef Riblets with Soy Hoisin marinade!

Our Finished Smoked Beef Riblets with Soy Hoisin marinade!

Smoked Beef Riblets with Soy-hoisin marinade Click To Tweet

Listen to our blog Smoked beef Riblets

One of my favorite cuts of beef to smoke and grill is the beef flank riblet. This is a cut of beef short rib known as flanken. In the flanken style of short rib, this thin cut, which is about 1/2-inch thick, goes across the bones so that each slice contains a few pieces of bone rather than between the bones as is done in traditional short ribs.

This is a popular way to cut the short ribs if you’re going for a Korean barbecue which we are kind of doing with our marinade that has Asian influences. I recommend doing about 4 pounds of flanken style short rib though today I’m doing 8 lbs. which means I’m doubling the recipe. The best part is these ribs don’t take very long to smoke on the grill.

(more…)

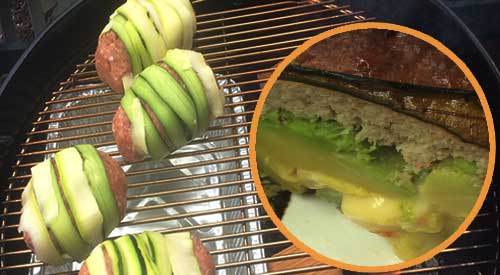
This avacado recipe features melted cheese stuffed avacado inside Turkey, wrapped with Zucchini strips.!

This Avocado recipe features melted cheese stuffed avocado inside Turkey, wrapped with Zucchini strips.!

This Avocado Recipe is double stuffed for Yummy Flavor! Click To Tweet

Listen to our blog

I love taking a basic recipe and being able to offer variations to that recipe which allows the cook to customize for those being served. That’s why I refer to this recipe as the Versatile Smoked Avocado Loaf since you will have options in the ground meat or poultry used to surround the cheese filled avocado as well as the cheese and outer covering to the loaf. This is referred to as a meat wrapped, stuffed avocado recipe.

(more…)

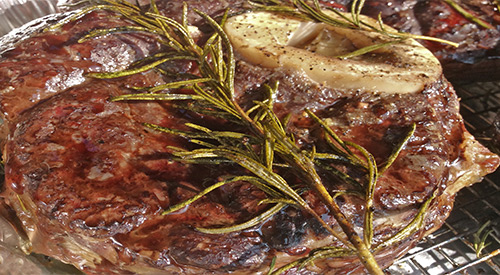
Look how juicy our Rosemary infused Smoked Beef Shanks are after we removed them from the grill!

Look how juicy our Smoked Rosemary Beef Shanks are after removed from the grill!

SMOKED ROSEMARY BEEF SHANKS FROM THE GRILL

listen to this blog


I’m back with another recipe for beef shanks that takes advantage of seasonal herbs with a simple smoking technique that can be done on your gas or charcoal grill. I’ve been busy in the kitchen with another seasonal harvest so I’m going to cook my beef shanks on the gas grill using my favorite two-zone cooking method that allows me to step away from the grill. Of course, I want some wood flavoring in these shanks so I’ll be using cherry wood chunks in a standard metal smoking box.

(more…)

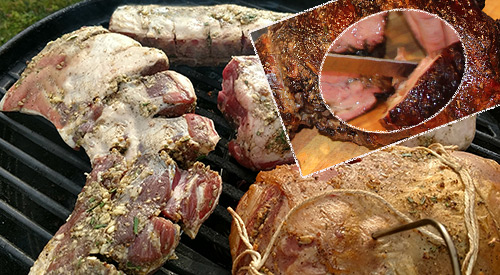
Our collage of cooking the leg of lamb, finished and cut leg of Lamb

Our Wood Fired Leg of Lamb


WOOD FIRED LEG OF LAMB

Summary:

Our wood fired leg of lamb, is charcoal grilled lamb over Charwood, which is directly fired lump charcoal or cooking wood chunks. Wood cooked Lamb using sugar maple hardwood has great flavor! Syrah wine, Garlic, Onion, mint leaves make up our fresh herb rub or grilled lamb marinade. Add this to your grilled lamb recipes

listen to this blog


Lamb is one of those proteins that tend to be associated with special holidays and occasions rather than as a common animal protein to introduce to the grill. Let’s change that with this easy and highly flavorful way to add wood flavoring to cuts of lamb on the charcoal grill. Know this technique can easily be done on the gas grill as well so simply pick your equipment and follow the suggested technique to bring abundant flavor and juiciness to your favorite cut of lamb.

I’ll be doing a leg of lamb and rib loins of lamb on a charcoal grill using charcoal and wood chunks to bring the great smoke flavor.

Leg of Lamb- Grill Set Up

(more…)

CORNISH GAME HEN MEETS SMOKE IN THE ORION COOKER and turns very golden brown

CORNISH GAME HENS MEET SMOKE IN THE ORION COOKER

CORNISH GAME HENS MEET SMOKE IN THE ORION COOKER

listen to this blog


Often, when it comes to smoking poultry, many people become quite nervous as they may have had a previous experience that resulted in a dry outcome. Or, they may have read how difficult it is to maintain moisture when you smoke poultry. Today, I’m going to show you how to smoke Cornish game hens on the Orion Cooker.

Why does the Orion Cooker make a difference? Because this isn’t a traditional smoker. This is a convection cooker that you can smoke with.

Cornish Game Hens- Preparing the Orion Cooker

(more…)

Our finished beef short ribs after applying our techniques of adding rub and cooking on the gas grill with wood chunks. Oh so yummy!

Our finished beef short ribs after applying our techniques we describe in this blog

SMOKED BEEF SHORT RIBS

listen to this blog


Of all the cuts of ribs, this is likely my favorite. Found between the 6th and the 10th ribs of the animal, the meat on these ribs lays on top of the bones rather than between them like with back ribs. Short ribs require a method of cooking that will allow them to tenderize as they have a lot more meat, fat, connective tissue and flavor than pork ribs. Because of all that fat and connective tissue, beef short ribs need to be cooked to an internal temperature of 200°F.

Today, I’m going to cook my beef short ribs on the gas grill using an indirect method of cooking and wood chunks to bring great smoke flavor.

(more…)

Smiling Burnese child before surgery for wide, bi-lateral cleft Lip repair. After surgery photo of same child showing the correction!

Smiling Burmese child before surgery for wide, bi-lateral cleft Lip repair. After surgery photo of same child showing the correction! DINING FOR SMILES EVENT PREPARATIONS

DINING FOR SMILES EVENT PREPARATIONS

listen to this blog


With the goal to repair children’s broken smiles by providing free comprehensive treatment for cleft lip and palate anomalies in under-served areas of the world, Alliance for Smiles, founded by six members of the San Francisco Rotary Club, Board member Carl Vahl (Chef Calle) hosted a gourmet, six-course dinner to raise funds for this exceptional cause at the Enchanted Valley Inn. And SmokinLicious® was right there to lend our support. We’re going to provide you with a behind-the-scenes look at what goes in to preparing a six-course gourmet meal featuring wood-fired fresh Canadian salmon and wood-fired leg and loin of lamb.

Dining for Smiles- Early Fire Start

Charwood burning in preparation for the grill and food cooking For SmokinLicious®, set up is crucial for a long event that has the menu relying on the perfection of the wood-fired proteins. That means ensuring plenty of charwood and wood chunks are at the ready. We keep two chimney starters loaded with charwood to keep a steady flow of hot coals going into the grills. Since this event’s gourmet menu featured four foods to be wood fired – lamb, salmon, red peppers, and Brussels sprouts – it’s necessary to get the fires going early so they can burn down to hot coal beds. That is the key to successful wood-fire cooking. Don’t cook over flames, only hot coals that will radiate heat throughout the grill.

Dining for Smiles- The Wood-Fired Foods

(more…)

Our guest blogger provides great insights into grilling a Beer-Can Chicken

Our guest blogger provides great insights into grilling a Beer-Can Chicken

GRILLING A BEER-CAN CHICKEN

Guest Blogger:

Source: eReplacementParts Blog

Author: John Thomas

Beer Can Chicken- The “Wow” Factor:

What says “grill master” more than grilling a whole chicken sitting on top of a can of beer that is infusing flavor and moisture into your bird? Beer-can chicken is often overlooked on the menu, but it’s a fun and proven way to grill a tasty whole chicken. Grab a whole chicken from the grocery store and beer or even some root beer or soda and get that thing on the grill for a guaranteed successful meal. This is an easy method for grilling a flavorful and tender chicken that keeps all eyes on the grill and provides that “wow” factor for any cookout you host.

Sure, it’s called “beer-can chicken,” but that doesn’t necessarily mean you have to use beer. There are tons of flavorful canned beverages out there if you are so inclined to something else. Any soda will make your chicken pop, or even an empty can with a little water and garlic. Beers like imperial stouts, pilsners, or lagers are great, but some other fun ideas include orange soda, cola, or root beer. Regardless, pick your favorite beer or soda. The first key to sitting your bird on top of a can is to make sure you start with room temperature beer or soda. You want that liquid to steam and if you start off with a cold beverage, it just might not get hot enough. Second, don’t use a full can. It takes a lot of heat to get that liquid to steam, so empty at least half the can prior to inserting it into the cavity of the chicken.
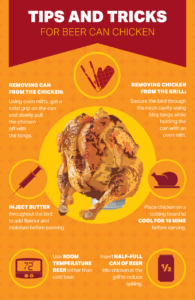
Tips and Tricks infographics

Beer Can Chicken- Two Recipe Choices:

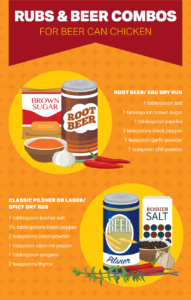
For those of you who choose not to grill with beer, the first recipe choice offered here is a BBQ root beer chicken. This flavorful bird has a classic BBQ dry rub on the outside and root-beer-infused sweet flavor and moisture on the inside. The bird is brushed with any BBQ sauce you like toward the end of the cooking. After cleaning out the chicken, mix these dry ingredients together and heavily apply this simple BBQ dry rub all over the bird.
Rub infographics

1 tablespoon salt
1 tablespoon brown sugar
1 tablespoon paprika
2 teaspoons black pepper
1 teaspoon garlic powder
1 teaspoon chili powder

Place the chicken on top of a can of root beer and grill as instructed below. If root beer isn’t your thing, orange soda can be substituted in this recipe.

The second recipe is more of a classic beer-can chicken that has a spicy dry rub applied to the outside. A classic pilsner or lager is used to provide moisture and flavor to the bird. The ingredients for the spicy dry rub recipe are as follows:

1 tablespoon kosher salt
5 tablespoons black pepper
2 teaspoons onion powder
1 teaspoon cayenne pepper
1 tablespoon oregano
2 teaspoons thyme
2 teaspoons paprika
1 teaspoon garlic powder
1 tablespoon red pepper flakes

Clean out the bird and heavily apply the dry rub all over the outside. For an extra pop, a poultry butter injection inside the bird is fantastic. Most grocery stores sell a food injection needle set. Melt some butter and inject it into the thickest part of the breast and into the legs and thighs. The buttery flavor can’t be beaten.

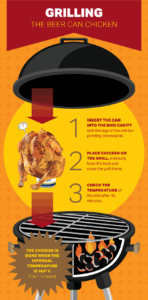
Now that you have applied your dry rub to the chicken, set up the grill for indirect heat. For indirect heat, place charcoal on half the grill and cook the bird on the other half, above an aluminum tin to catch drippings. Grilling the chicken at a more moderate temperature reduces the chance of scorching the bird on the outside and undercooking the inside. On a gas grill, ignite the burners on only one side to medium-high heat. You want the grill to be at about 400-425 degrees for grilling a beer-can chicken.
Grilling infographics

It’s easiest to insert the can into the bird right at the grill to avoid it tipping over inside the house. The legs of the chicken extend down toward the grill and the can is inserted into the cavity between the drumsticks. After the grill is pre-heated, set the chicken, neatly propped up on top of the can, on the indirect heat side of the grill and close the grill dome. After about 45 minutes, check the internal temperature of the bird. The chicken will be done when the internal temperature is 165˚F. It should take about 1 to 1-1/2 hours to fully cook the bird, depending on your grill temperature.

Once your chicken reaches 165 degrees, you’ll need to remove the can and the chicken from the grill. Take some extra care to safely remove the bird from the grill. Use grill tongs placed in the neck cavity to secure the bird from the top while carefully holding the bottom of the can with some oven mitts or pot holders. The can will be hot and you can burn yourself and you don’t want to spill any liquid from the can. Get a solid grip on the can with your oven mitt/pot holder and slowly pull the chicken off the can with your tongs, then place it on a plate or cutting board. Leave the can on or near the grill and allow it to cool. Bring the bird inside for a quick 10-minute rest followed by carving.

Beer-can chicken is a fun way to grill an entire chicken. The method places the bird in an ideal position for grilling while providing a flavorful, inventive moisture source underneath. Try experimenting with any soda or beer you might like. You’re guaranteed a juicy chicken with a unique grilled flavor. Hope you enjoyed the bloggers Grilling a Beer-Can Chicken!

Source: eReplacementParts Blog

Author: John Thomas

Our culinary crew tested this recipe on open fire pit! Below are our results:
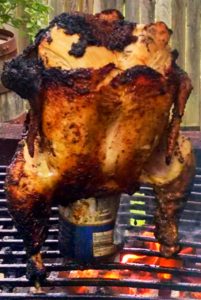
The culinary crew tested this recipe on an open pit cooking area! We were satisfied with the outcome and are passing on this recipe to you!

The culinary crew tested this recipe on an open pit cooking area using Smokinlicious® Double Filet! We were satisfied with the outcome and are passing on this recipe to you!

Smokinlicious® Double Filet


Dr Smoke

Dr. Smoke- Our team found this to be an easy recipe “grilling a beer-can chicken” submitted to us as a “guest” blogger! You should try it!
« Previous PageNext Page »